Friday, April 19, 2013

More Felting adventures

Corrections for the Chameleon bracelet are in the April 2,2013 post; the free ribbon cuff is on the February 16,2013 post.

I went to NJ for my mom's 90th birthday in March.  We had a great time, a party for Mom, visiting relatives and friends, a little yarn shopping.  One of my friends took us to NYC to see a play.  We had a great time, thank you Cheryl.

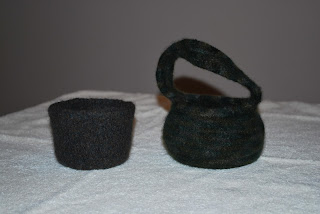
My sister and I have been felting, or to be more accurate, fulling.  She knits, I crochet, we have been working on some things and when we got together at my mom's we felted them.  Marie has been doing these wonderful big baskets - they work great as cat beds and she made one for her yarn.  We also did some baskets, bowls and vases.  We did learn that the felting worked better after I had run several loads of wash.  The hot water was much hotter and it made a difference in the felting.  Here are some of our projects.

Marie's basket before felting

Same basket after one washing; you can still see the stitches
 

Same basket after a second wash in hotter water;
much more blending and it is stiffer
 
 
This is a moebius basket that works well as a cat basket;
the design has been cat tested!


Marie's bowl and a moebius basket


Pat's two vases (crocheted), same pattern (different rim) same yarn;
the second one is MUCH smaller, it was washed in hotter water
and it is much stiffer 
First vase with a glass vase and flowers in it

Pat's crocheted moss basket or nest.  Wool yarn with acrylic green fluffy stuff;
I want to wash it again

As you can see we got quite a bit done.  Part of the shopping was at a small yarn shop, I found lots of yarn on sale to make Guardian's of the Forest.  These will be soft and semisoft crocheted and fabric sculptures inspired by some pictures we took while walking the celery farm.  You know how you can see shapes in the clouds?  Well you can see faces in the forest.  We are calling them guardians and I have started work on them.  I will post when I get a few more done.

Tuesday, April 2, 2013

Corrections for Chameleon cuff

Ok - enough rejoicing - there are several errors in the directions for the Chameleon cuff.  I am so sorry, apparently they mixed up my original amethyst bracelet which is on a 1.5 inch cuff  and the bluewater quartz (a 1.25 inch cuff)that I made using their thread selection (which they did not show). 

The directions as they are will work fine for the 1.25 inch cuff using 4 mm beads and size 10 thread except that Row 3 will have 24 stitches not 28.  

As with all bead crochet, the "wrong side" becomes the right side, the beads will form on the outside of the tube, there should be NO NEED to turn the cuff at the end.

Here are the corrections.

First - the thread shown is Lizbeth lavender size 20.  The holes in chips are often smaller than beads so size 20works better than size 10.

Second you will need about 122 to 133 chips - smaller thread = more rows - I string about 150 chips myself.

The 1.5 blank is basically 2 stitches wider (front and back) than the 1.25 blank

Foundation row - ch 13,

Rnd 1:  sc blo in 2nd chain from hook and each ch across to last ch, 3 sc in last ch, rotate work and sc in unused loop on next 10 stitches, 2 sc in last stitch, join with sl st to first stitch (26 st) place marker (pm) Move marker up at end of each round

Rnd 2: Ch1 sc in next 12 stitches, 2sc in 13th stitch, sc in remaining stitches,  2stitches in last stitch (28 st) slst in the chain 1 at beginning of row.

Rnd 3: Ch 3 (counts as dc throughout) dc in 1st stitch of previous row, dc in all stitches around, (be careful not to dc in base of ch 3, you will end up adding stitches you do not want) sl st in top of ch 3; ch 3 (28 st)


The thread should be a starting to form an oval cup, slip the tip of the brass blank into the cup to make sure that it fits the blank.

Rnd 4: Ch 3  Double Crochet in first stitch, dc in 2nd stitch,*dc with bead (dcwb) under both loops (the chips are heavy and need the support) in next dc.  Dc in next dc (double crochet without bead).  *; repeat from * 4 times.  You will have 5 beads on the front of the work alternating with plain dc.  Dc in next stitch, dc turning stitch, dc along the back 14 st to the beginning.  Slst in top stitch of chain 3.


Rnd 5: Dc in first dc,  * dcwb,  dc in next stitch. * repeat from * 5 times (you will have 6 beads on this row – the rows alternate so the beads are staggered), continue to dc around to the beginning, join w slst to top of chain 3, chain3.


TIPS:

·         The beads form alternating rows of 5 and 6 beads

·         For bead stitches, snug the bead up next to the crochet hook before you yarn over (yo)

·         Draw up only the beads you will need on your tension hand, you will have to slide the beads along the thread to access more thread for crochet

·         Every few inches, slide the cover on to the blank.  Crocheting in the round tends to make the design twist, putting it on the blank will help straighten it out and help you see if you missed any stitches.

·         Whenever you put the project down, put a small safety pin through the working loop to prevent unraveling.  It is a good idea to store the cover on the blank when you are not working with it.

·         If the “twist” is too much for you, block the finished bracelet bead side down on a soft surface, like a towel.